(Published November 18, 2019)
Introduction
This Glitch Taxonomy Kit offers an introduction to circuit bending a Nintendo Entertainment System (NES) videogame console as a game studies methodology. Circuit bending—manually manipulating the flow of electricity on a circuit board in order to create different audio or visual effects—can be described as a close study of hardware, one that considers material elements and operations in relation to on-screen and speaker-related output. This approach offers scholars a new perspective from which to critically examine videogames and dig into the ways in which games are played and perceived.
Studying circuitry at a material level forces the circuit bender to recognize parts and operations rather than fetishize invisible processes and visually aesthetic output. Such examinations of electronic objects (such as circuit boards) or game devices (such as game consoles) are inherently tied to tacit, lived experience. What results from this hands-on practice of circuit bending is a self-reflexive, embodied, and situated study of videogames. The Glitch Taxonomy Kit walks readers through the circuit bending process, explaining how to take apart the console, “read” the circuit board through hands-on prodding, create glitches, and put the console back together.
As part of the kit, I am including a “Glitch Taxonomy,” wherein I interpret and describe the glitches that emerged for me, including their relevance to how games are played, perceived, and interpreted. By articulating these insights, I demonstrate how circuit bending can function as an embodied hermeneutics—a haptic study and consequent practice of interpreting the media device at the hardware-level of operation. The resulting taxonomy of glitches describes how game content expressed via the screen and speakers is directly linked to, and operates recursively with, the gaming system of an NES console. Circuit bending as a practice helps to unfold the seemingly abstract connections between the embodied push of a button and the sounds transmitted through speakers, uncovering aspects of how graphic and sound-based effects work across a given platform. The interpretation of each resulting glitch is influenced by personal limitations, situations, and contexts.
Forms of game hacking, modding, and glitching have long been popular. Circuit bending emerged as a creative electronic music practice that consists of chance-based audio manipulation of children’s toys and other simple electronic gadgets in order to make new instruments.[1] Similarly, software and hardware mods are often recognized as creative forms of art and play in game contexts. For instance, Cory Arcangel’s “Super Mario Clouds” modification of the Super Mario Brothers cartridge is a well-known hardware mod in which all visual elements from the game are removed except the blue sky and clouds that make up the background. Beyond creating aesthetic manipulations, gamers often come up with purposeful hacks and tricks that facilitate new forms of gameplay, such as “speedrunning,” which uncovers exploits in order to move through a game more quickly. Another example is Jonathan Johnson’s circuit bent “glitch controller,” which allows a second player to control glitches on the SNES during gameplay. DIY game creation makes up another sphere that is encouraged by Anna Anthropy in Rise of the Videogame Zinesters. She sees DIY game making and hacking as an opportunity to move past the exclusive and discriminatory culture facilitated by the videogame industry and describes how hobbyists can make and mod their own games so that more diverse perspectives can be represented. Whether as a creative art form, as a way to enhance or adjust gameplay, or as a form of social or cultural commentary or activism, engaging with games can be seen as forms of metagaming whereby play extends beyond the formats originally intended by the game company and functions as a “broad discourse.”[2]
In the context of these different types of metagaming, circuit bending and interacting with a “glitch console” falls under the sphere of creative play, while also opening up the opportunity for critical, tacit, and self-reflexive analysis of videogames at a hardware level. I see circuit bending as a material, practice-based engagement with hardware that offers a way to understand the unique, physical properties of videogame platforms. By studying the material compilation and connections on circuit boards, hardware hacking leads to an awareness of the minute, forensic details at work in videogame consoles and videogame labor.[3] While the focus of game studies so often veers to the analysis of output (graphics, sound) and the seemingly “immaterial” operations (code, software), hardware hacking in the form of circuit bending brings attention to the material components of which the console is made, extensively, leads to questions regarding the sources, processes, labor, and disposal of those material components.[4] The physical manipulation of the circuit board and the new forms of interaction facilitated by the “glitch console” also bring up questions that get lost when the player is purely enthralled and distracted by the intended design of a game, such as privileges related to access, time investment, and ability. As such, circuit bending opens up a metagame that moves beyond the operational rules encoded in the game and wired into the console. In other words, circuit bending game consoles politicizes forensic engagement with technologies and does so in a creative manner.
In presenting this how-to guide for circuit bending an NES and creating a glitch console in tandem with my analysis of glitches articulated as a glitch taxonomy, I intend to show how circuit bending, if done as a form of inquiry, can function as a critical approach.
Instructions: How to Make a Glitch Console
A Note on Safety & Disclaimer
The steps outlined in this tutorial are for informational purposes only. Working with electronics includes risks, and it is recommended that anyone who works with electronics or engages in a circuit bending project spends time educating themselves on safety measures and best practices in working with electrically powered items.
While this Glitch Taxonomy Kit describes the processes and steps I have taken to circuit bend and create a glitch taxonomy, any reliance you place on such information is strictly at your own risk. The publisher and the author disclaim any liability for injury or damage that may result from the use, proper or improper, of the information contained in this kit. I do not guarantee that the information contained herein is complete, accurate, or safe. When working with electronics, you should always apply your own judgement and common sense and engage in further research to ensure you understand safety requirements.
The most important thing to remember is do not use AC power when circuit bending. Although the Nintendo console regularly plugs into a wall, as soon as you start taking apart the console you must ensure that it is unplugged. AC-powered things can kill you. If you take apart your console and/or start circuit bending it, you should only use battery power. In the kit, I will describe how to battery power your Nintendo circuit board. You might find other tutorials that make use of wall-wart plug-in power adapters instead of batteries, but that method should not be used unless you have a thorough understanding of electricity and safety measures.
I recommend that anyone who wants to engage in any circuit bending spends time learning about electrical safety when circuit bending. Some recommended readings for this purpose are Nicolas Collins’ Handmade Electronic Music: The Art of Hardware Hacking and Reed Ghazala’s Circuit Bending: Build Your Own Alien Instruments.
Materials
You will need a standard console setup:
- Nintendo Entertainment System (the best luck I’ve had finding NES consoles is in pawn shops)
- A TV with AV or Coaxial Cable Connector input
- NES games
In addition to that, you will need the following in order to circuit bend your console (numbers correspond to those in the image below):
- A screwdriver to take apart and put back together the console housing
- Breadboard jumper cables (or you can use cut and stripped strands of hookup wire)
- Alligator clip jumper cables
- Hookup wire (22-24 gauge)
- Potentiometers (try 1K and 10K potentiometers)
- Toggle switches
- 9-volt battery clips with standard barrel jack
- 9-volt batteries (I recommend getting rechargeable ones, since you will go through lots of them)
- Soldering iron with a fine point (25-60 watts)
- Rosin core solder
- Diagonal wire cutters
- Wire strippers
- A 3rd hand or vise

Figure 1. Selection of tools and materials.
Taking Things Apart
Taking apart the NES console is quite straightforward. The tricky part is remembering how to put it back together. A good way to document the process is to take photos or a video while you work. That way, you have something to reference when the time comes to put it all back together.
Start by unplugging everything (power, RV cable, controllers). Then open up the console housing by unscrewing it from the bottom of the console. Next, you’ll find a metal cover over the cartridge and circuit board. Unscrew the metal cover and remove it. You now have access to the cartridge. The plastic cartridge holder needs to be unscrewed and then carefully detached and pulled out. You’ll now see the full circuit board exposed, but it’s still attached to another metal cover. You’ll need to unplug the console buttons and controllers from the circuit board in order to remove the metal cover. Finish by removing the circuit board completely from the housing. You now have a fully exposed circuit board to play with.
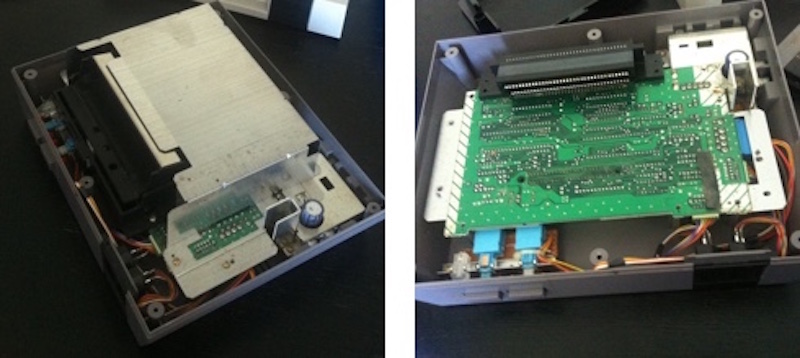
Figure 2. Taking the console apart.
How to “Read” the Circuit Board
Circuit bending consists of the process of creating “glitches” (effects that were not originally intended for the device) by adjusting the flow of electricity on an exposed circuit board.[5] This is usually done by using fingers or wires to adjust the resistance and to connect different points on the circuit board, thus creating new effects in the output. As Reed Ghazala explains it, “essentially, to bend a circuit you hold one end of a wire to one circuit point and the other end to another point. That’s it!” (4). As outlined in this section, circuit bending begins by familiarizing yourself with the circuit board, walking through the landscape of the board to come to understand the different components that the board consists of – a “reading” of the board or, as Nicolas Collins puts it, the process of “laying of hands” (59).
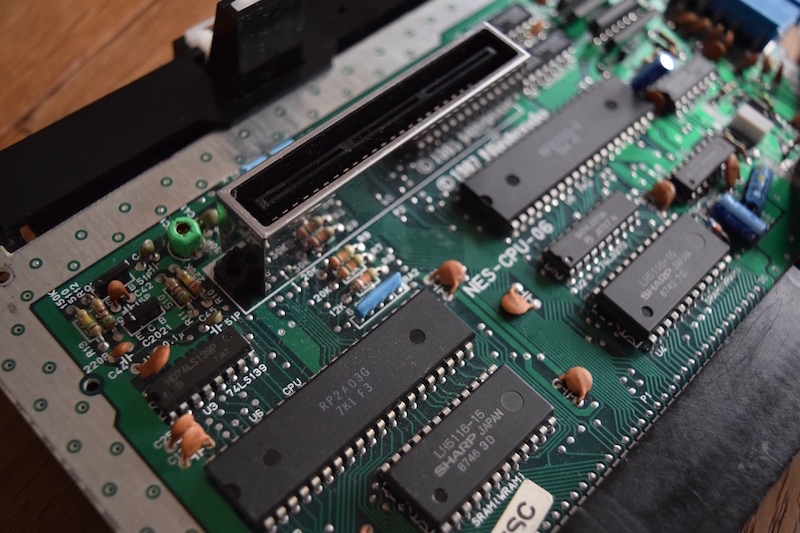
Figure 3. Close-Up of the circuit board landscape.
To get set up you’ll need a TV, NES games, your circuit board, 9-volt battery and battery clip, the controller outlets and controllers, as well as the console buttons that you unplugged from the circuit board earlier. Re-attach the plastic cartridge holder and plug the controller input and console buttons back into the circuit board (now that you’ve removed the board from the housing, you can re-connect them while keeping the full board accessible). Plug in one or both controllers. Next, connect the board to your TV – you’ll see the AV or Coaxial Cable Connector inputs on the small metal box that’s at one corner of the circuit board. Finally, connect your 9-volt battery by plugging it into the power input on the same metal box (remember: do not use wall power while you’re circuit bending). Note that aside from connecting the power and TV through that metal box, you should not tinker with it otherwise. It contains a capacitor that can load a very heavy electric charge; while you can play around with the other exposed elements on the board, that capacitor is covered and protected for a good reason, so don’t mess with it.
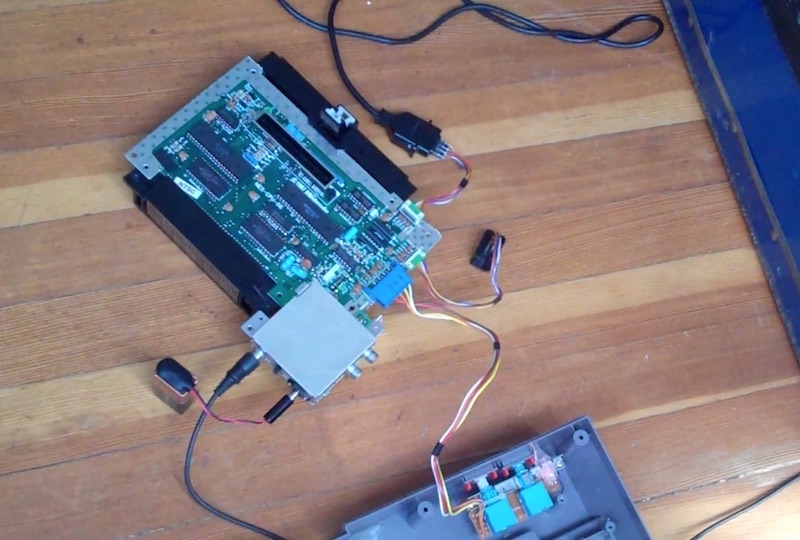
Figure 4. Battery-Powered circuit board.
Next, make sure you have your breadboard jumper cables or some cut and stripped strands of wire. Turn on the TV and your console (with a game in it). To start exploring your circuit board, take a jumper cable or strand of wire and simply start by touching and connecting different points on the board. A good place to start is by connecting different resistors, capacitors, or microchip solder points on the board.
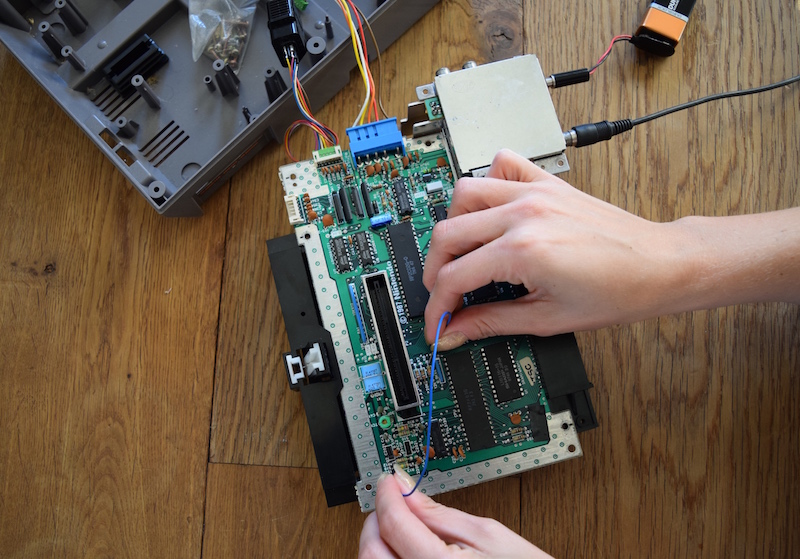
Figure 5. Connecting resistors with a jumper cable.
Some connections might not cause any effects, others might simply shut the console off or result in a blank screen of some sort, and then there will be other connections that will lead to interesting glitches. There is always a chance that some connections on the board might overpower components and cause damage to them. The integrated circuits or microchips are especially prone to this, and I damaged a couple of boards while I was creating my glitch console.
While the process of familiarizing yourself with the board might take time or even feel somewhat tedious, this can be an incredibly creative process. It is completely up to you what kinds of glitches you find interesting, so enjoy this creative exploration. In order to keep track of the glitches you are creating during this process, I recommend taking notes on the connecting points and resulting effects. Here is a printable visual of the circuit board, for you to jot down your notes.
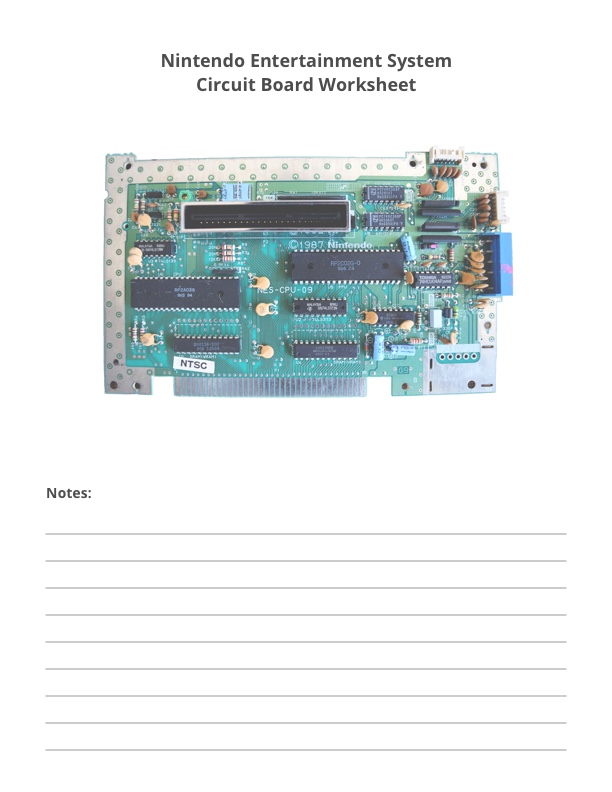
Figure 6. Circuit board Worksheet. [downloadable PDF Version at https://github.com/hyperrhiz/glitch/blob/master/worksheet.pdf]
Another thing to experiment with as you’re connecting points on the circuit board is to add potentiometers to the mix. Potentiometers allow you to adjust the resistance using a dial. I recommend starting with a 1K potentiometer, but you can also try a 10K or other values. The effects you see using a potentiometer might vary, and for some glitches you might even be able to see the glitch scale as you adjust the resistance.
Creating a Playable Glitch Console
If your goal is to create a playable glitch console like the one I chose to make, then you’ll want to find glitches that allow you to modify the output with new effects while continuing to play the games. To do that, make note of glitches that don’t shut down, reset, or make unplayable the game you’re playing. Next, try the same connection on the board with several different games and see if it causes similar effects across multiple games.
If you don’t know where to start, you can try to recreate some of the glitches that I decided to use for my glitch console. Below are examples of audio and graphic glitches to try out. There are four graphic glitches that I decided to solder (see Figure 7). There are also several audio glitches, which can be found by connecting different combinations of solder points between the resistors found in the top left area of the circuit board (see Figure 8). If you’ve found a few of your own playable glitches that you want to use, then that’s fantastic.
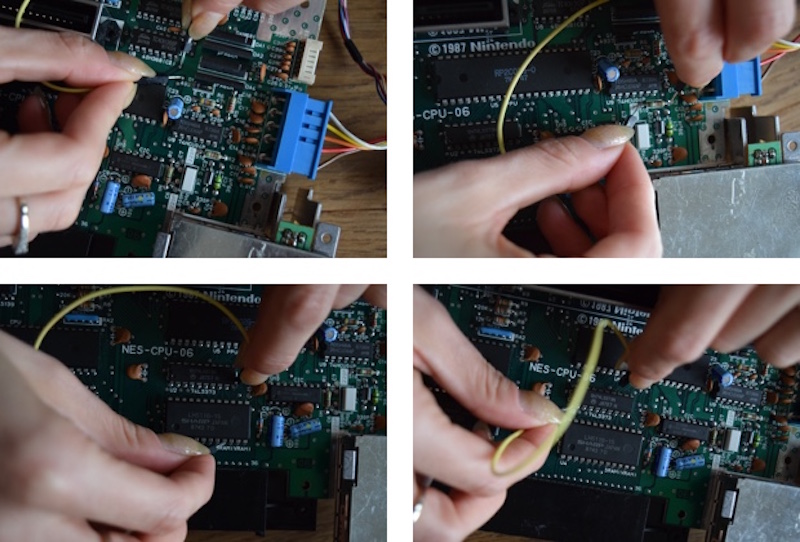
Figure 7. Graphic glitch connections.
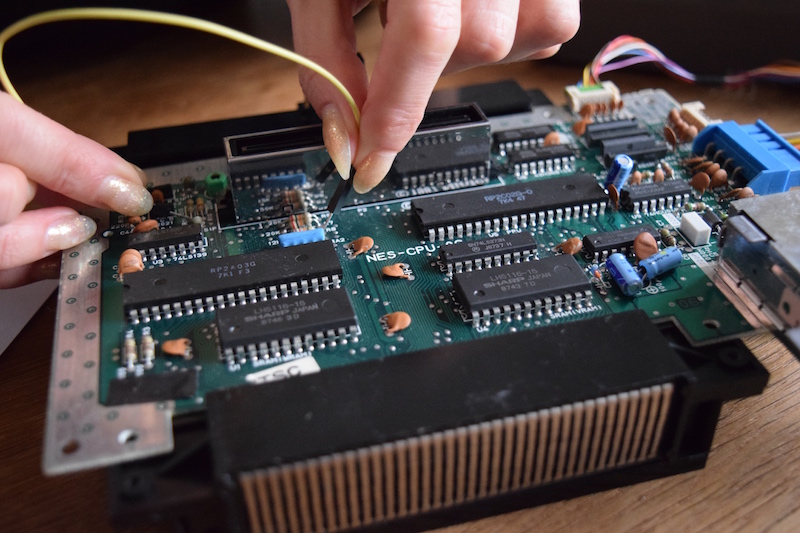
Figure 8. Audio glitch example.
The final steps in creating your glitch console are to make the connections permanent by soldering them on and then putting the housing back together. If you’ve never soldered before, Reed Ghazala and Nicolas Collins both provide great instructions on what you will need and how to solder electronics for circuit bending purposes.[6] I recommend that you take some time to learn to solder before you try to do this on your NES circuit board. As a brief introduction, I’m including an excerpt of the soldering instructions Nicolas Collins provides in Handmade Electronic Music:
We will begin by practicing soldering wires together—high temperature knitting.
- Plug in the iron and place it somewhere where the tip will not make contact with flammable, meltable or scorchable surfaces, or its own power cord (cute little wire rests are sold for this purpose). Wait a long time for it to warm up. The iron is hot enough to use when solder touched to the tip melts.
- Wipe the tip of the hot iron across a damp sponge. The tip must be smooth and clean enough that the solder flows evenly, leaving a shiny silver coating. If blobs of solder fall off and the tip remains grey and crusty even after sponging, unplug the iron and, try again (see figure 6.1). If the tip of the iron is seriously pitted you will need to replace the tip (or, if it is a cheap iron with nonreplaceable tip, the whole iron).
- Strip about 1 inch of insulation from the ends of two pieces of wire. Use the adjustments on the strippers (or a fine sense of touch) to avoid cutting through the wire. If the wire is stranded, twist the strands to eliminate frazzling. Hold the wires in something so that the tips are up in the air but don’t wiggle. You can use a fancy “third hand” gizmo (two articulated arms with alligator clips, affixed to a weighted metal base,) or a vise, or just weight the coil of wire down under a book or something.
- “Tin” the wires. Melt a small blob of solder on the tip of the iron. Hold this blob against one of the wires. Hold the tip of the solder roll against the wire, not the iron. After about two to five seconds the wire should be hot enough that the solder will melt, flowing around the wire to coat it evenly in a smooth layer; if not, apply a tiny bit more solder to the tip of the iron and try again [. . .].
Remove the iron from the wire. The solder should cool to a smooth, shiny silver; if it is rough and grey you did not get the wire hot enough—try again. Then go ahead and tin the second wire. (23-24)
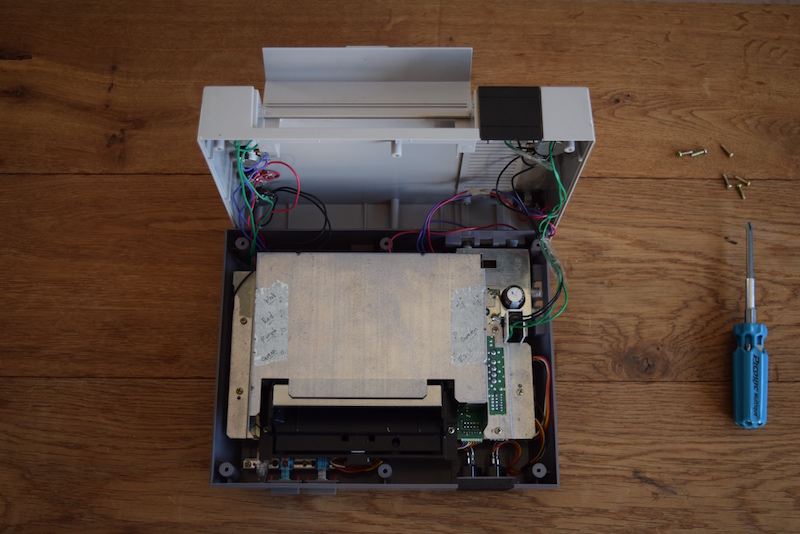
Figure 9. Open console with soldered switches and potentiometers.
Here are recommended steps to assemble your glitch console:
- Mark the points you want to connect, and remember to keep note of the potentiometer values to use (if you’re using potentiometers).
- Mark the places on the console housing where you will want to attach on/off switches and potentiometers for the glitches (I recommend using switches so that you have the option to turn the glitch off). Then drill large enough holes to fit the switches and potentiometers into the housing (remember proper safety measures when drilling, and if you don’t know what they are, then look them up).
- Cut and strip wire strands that will be long enough to connect the points, attach on/off switches, potentiometers, and reach the outer part of the console housing.
- Start by soldering together the switches and potentiometers. I recommend attaching them to the housing before connecting the wires to the circuit board, as it might be difficult to do so after you’ve soldered everything together.
- Once everything is in place, solder the wires to your previously marked points on the circuit board (this is where you’ll notice the importance of having long enough strands of wire, and remember that you’ll want to have some additional length so that everything easily fits back together once you add on the cartridge, metal cover, etc.).
- When you’ve finished soldering on all connections, you can put the console back together (this is where the videos/photos you took when you started out will come in handy).
- Once it’s all back together, you’re ready to play. When there are no wires, circuit board, or other electronic parts exposed, you can use wall power for your console again.
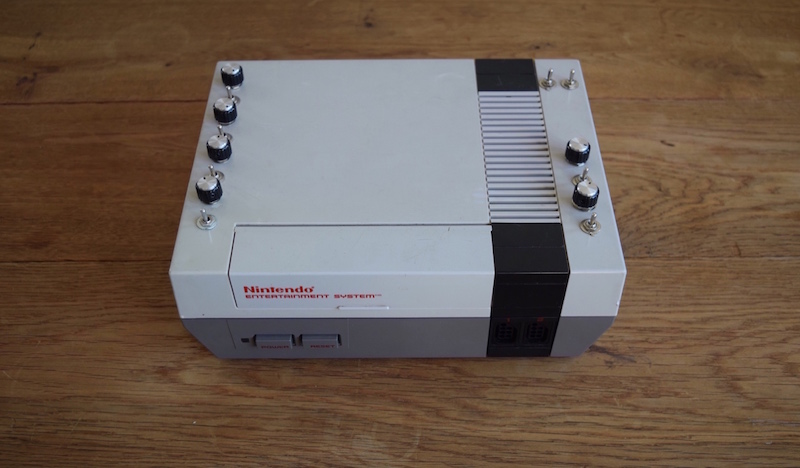
Figure 10. Completed glitch console.
A Taxonomy of Glitches
As demonstrated in the instructions, the process of circuit bending requires the hacker to engage closely with the circuit board, touching it, moving through its intricate parts in an exploration that allows them to get to know every small point on it. Going through this process led me to not only create but also interpret and describe the glitches that emerged, including their relevance to how those games are commonly played, perceived, and interpreted. As such, I argue that circuit bending can be seen as a game studies methodology, or an embodied hermeneutics—a haptic study and consequent practice of interpretation of the media device at its level of operation.
Such an approach to videogames encourages the study of the platform at the level of hardware operations. While glitches are often seen as something abstract and unintentional, going through the process of circuit bending and building a glitch console clearly indicates that glitches are accurate results of new electrical connections. Recognizing that glitches are not random, but functioning effects, led me to taxonomize and analyze the glitches that I created on my Nintendo console. The following taxonomy of glitches describes and analyzes the effects that I created by connecting specific points on the NES circuit board.
Playable vs. Non-Playable Glitch: Some glitches remain playable, while others freeze the screen. Most commonly, a bend will render the game unplayable because the amount of electric current is too high or too low. Thus, the role of electricity—something that may often go unnoticed when playing a videogame—is foregrounded. Non-playable glitches often tend to become fetish objects ascribed the power to foreground the machine through its failure to function as intended. However, even non-playable glitches represent the material operations accurately. If a short circuit results in a non-playable glitch, then the machine is not failing. It is doing exactly what it is supposed to do under those circumstances. Additionally, in contrast to purely aesthetic glitches, playable ones continue gameplay interaction and thus offer a form of metagaming that changes the inputs (i.e. new buttons and switches), the gameplay (i.e. new mechanics), and the outputs (i.e. graphics and sound).[7] Since they change the form of gameplay itself, these playable glitches can be seen as examples of Alexander Galloway’s “countergaming” of gameplay itself. Most videogame mods change the aesthetics or the software technology of games, but rarely mod actual gameplay—in fact, they often disrupt gameplay (Gaming 107-108). Rather than interrupting gameplay, playable glitches reinvent it.
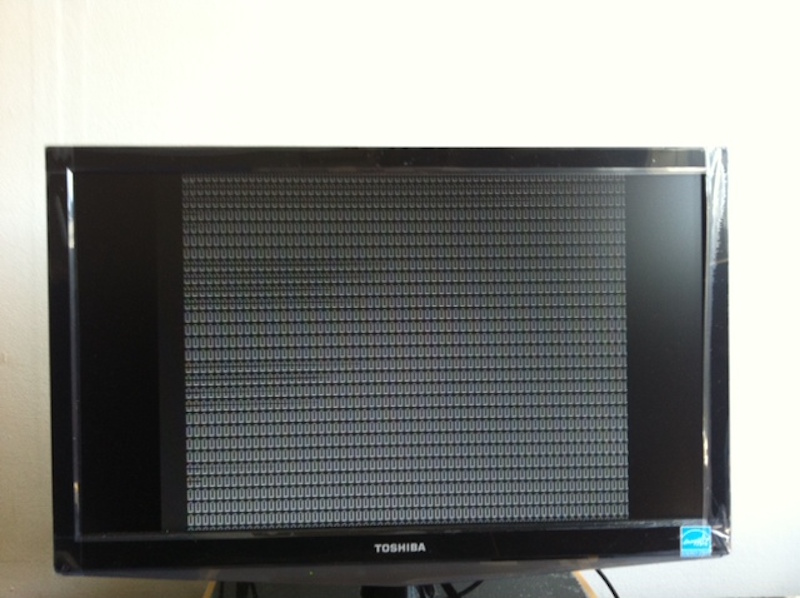
Figure 11. Non-Playable glitch.
Elements Glitch: Certain circuit bends draw attention to separate game elements, such as sprites,[8] background graphics, sound effects, and the play environment. For instance, in Super Mario Bros., I can create a bend that changes all background layers and visual accessories to blue, so that it visually distinguishes very simplified representations of the sprites and elements with which the player character interacts. Where audio is concerned, I can create a wire connection that triggers the sound of Mario getting a coin, but this sound appears independently from any other action (i.e., Mario does not actually get a coin, and no graphics indicate that he would). These glitches draw attention to the ways in which the material components on the circuit board affect the graphic and sound output represented in the form of certain elements (such as sprites or the coin sound). The result of these elements changing or appearing is not an immediate effect of the push of a button, but rather stems from the many material processes that have been obfuscated at the level of the interface in order to create the impression of causality.[9] Thus, the elements glitch challenges the medial ideology that the NES is reducible to a screen-based interface.[10]
NES Elements Glitch from Nina Belojevic on Vimeo.
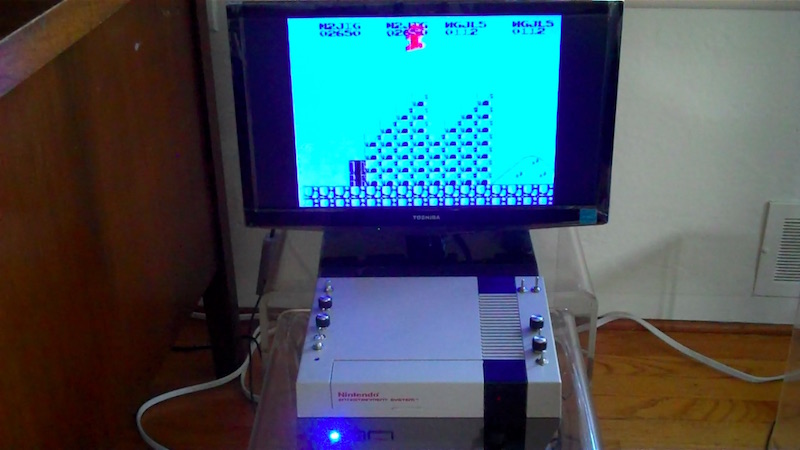
Figure 12. Elements glitch.
Pixelation Glitch: Every game on each unique console appears on the screen in a certain quality and pixelation; however, one fairly consistent NES glitch changes pixelation in order to create the appearance of lower quality graphics. This glitch highlights the computational nature of the visuals and offers a material trace via the interface. Put differently, pixels become a result of the action taking place on the circuit board. In this case, the machine is expressed in pixels, and the pixelation of a videogame represents the processing power of the console. Where the NES is concerned, the graphics for each game are optimized for an 8-bit game console, and changing the resistance on the circuit board draws attention not only to the graphics of a game like Mario but also to the electricity that triggers certain forms of output. By extension, glitches that draw attention to the graphic quality as articulated through pixelation function as a reminder of the materiality of images we see on screens. The graphic output is not merely a virtual or immaterial representation; it is a realization dependent upon material processes such as electricity. The pixelation glitch thus draws direct attention to the transduction of electricity into graphical output, the quality of which is shaped by processing power.
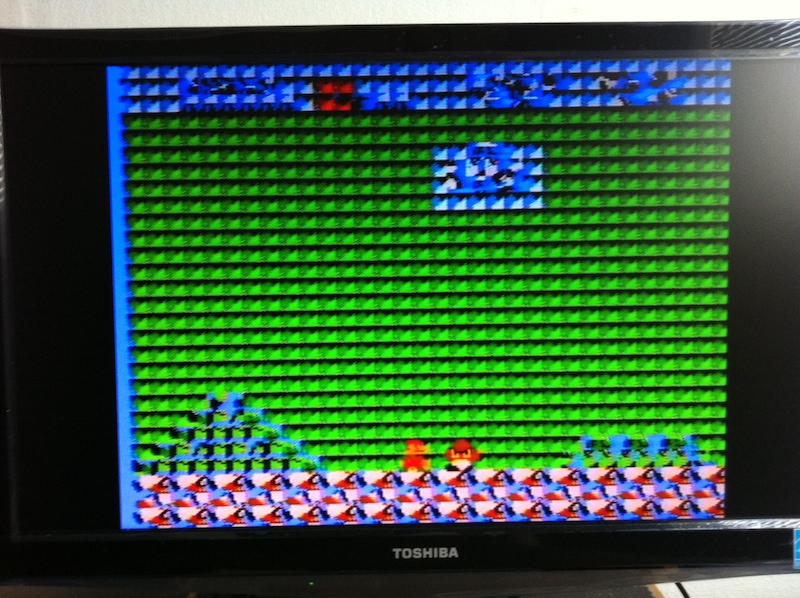
Figure 13. Pixelation glitch.
Relations Glitch: Circuit bending can also highlight the relationships between elements within a game, especially if these elements get distorted. This bend can consist of sprites interacting with one another, or graphics interacting with the mechanics of a game. In Super Mario Bros., one example consists of the actual physics of the game not aligning with visuals on the screen. With this bend in effect, gaps in the ground appear just before or after where the graphics would indicate they are placed. For instance, it looks like Mario has to jump half an inch later than he actually does, and—as a result—he ends up falling and dying. While a lot of modding and game-making software can make it seem as if the elements in a videogame get manipulated solely through software, this glitch shows that they are tied directly to elements on the circuit board. In that sense these glitches serve as a fundamental reminder that software still relies on hardware to execute actions.
Relations Glitch
NES Relations Glitch from Nina Belojevic on Vimeo.
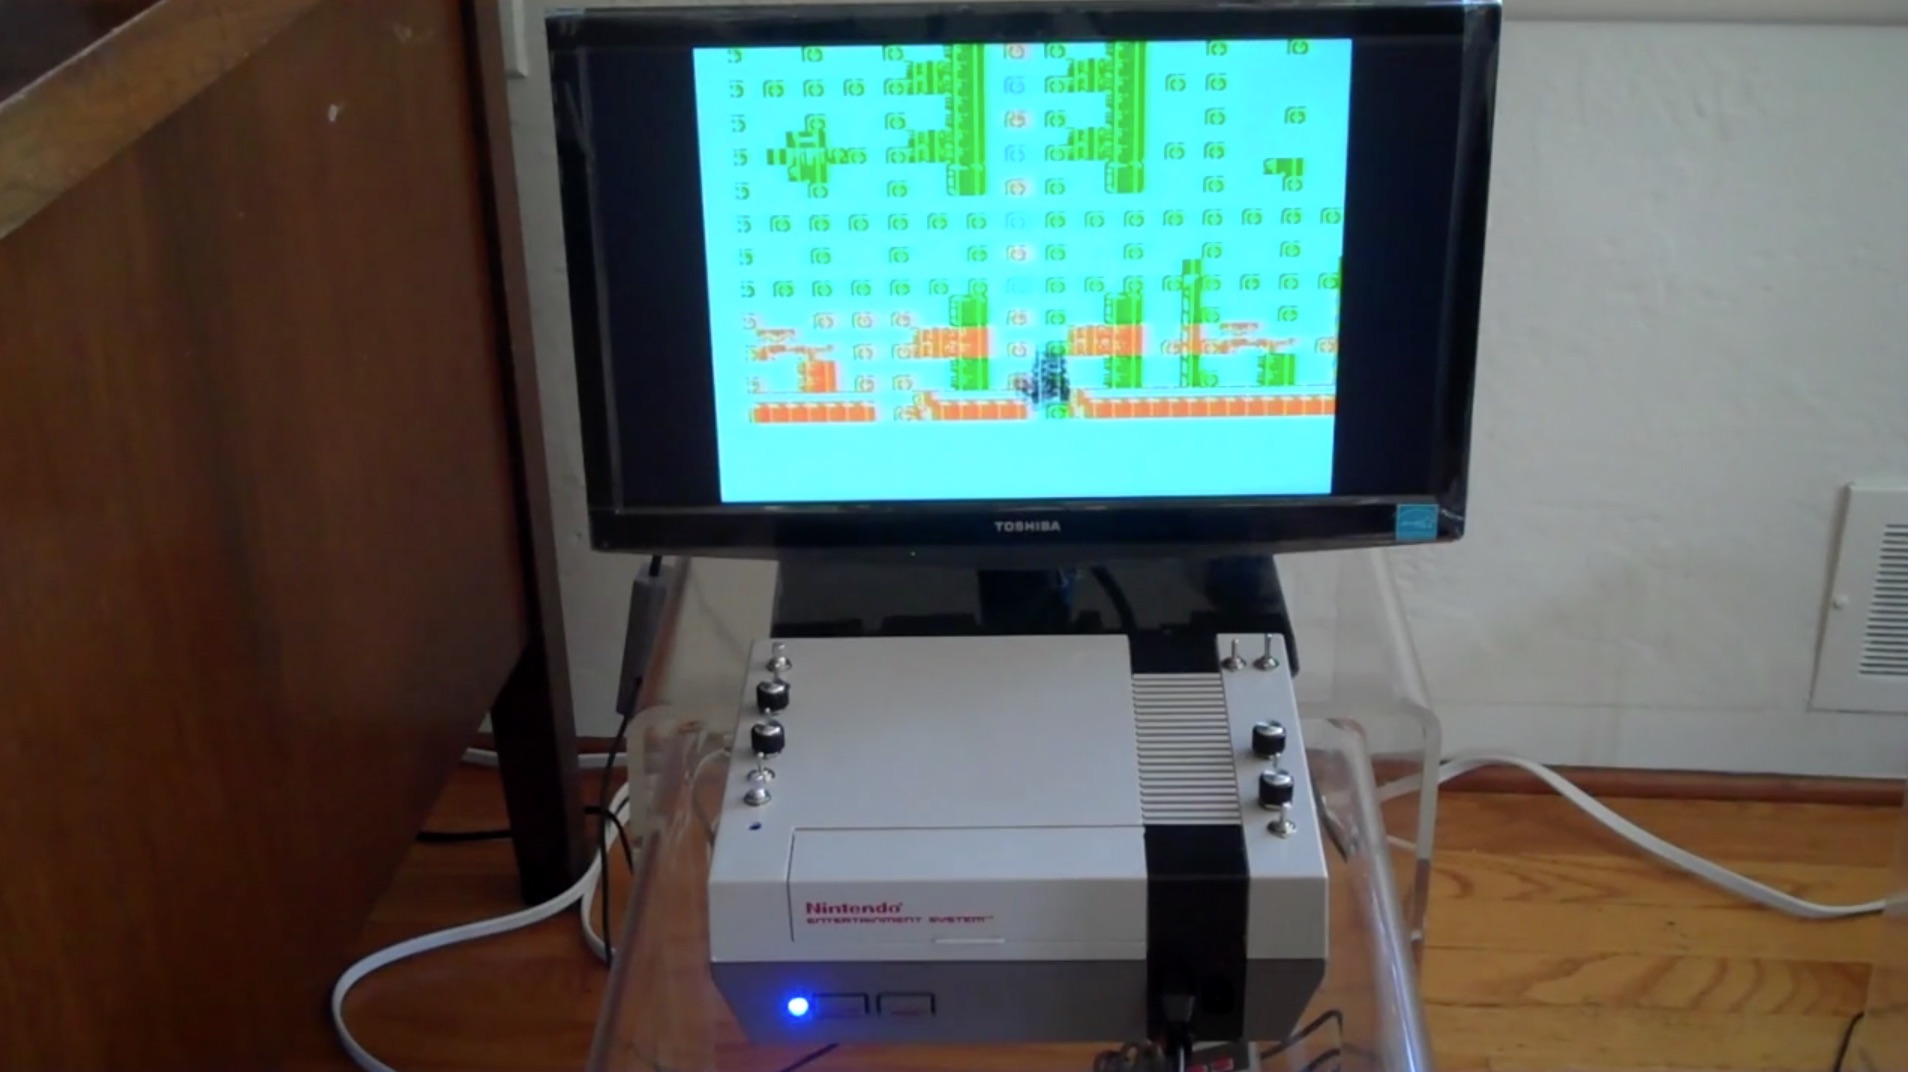
Figure 14. Relations glitch.
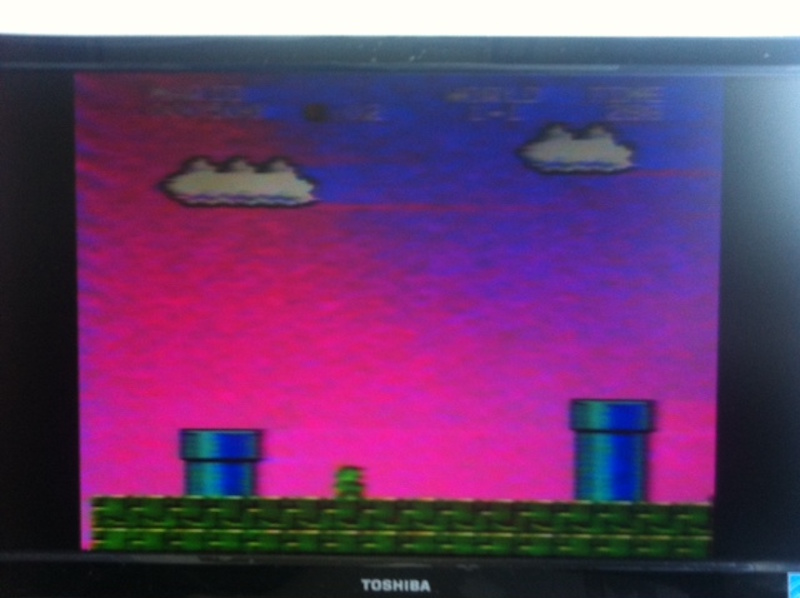
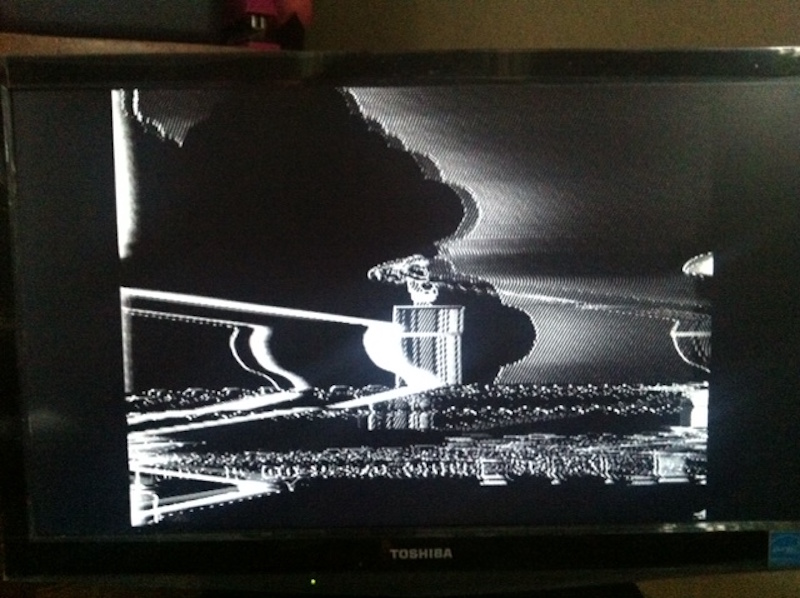
Ambience Glitch: Some bends maintain gameplay and all game elements, but slightly adjust the visuals (e.g., by changing the color scheme). However, such a small change can considerably alter the ambience of a game. A pink sky might make it look like Mario is taking an evening stroll (with the sun setting in the background), while a black and white background suggests a nightmare. Glitches that adjust the visuals of a game at a level of ambience are perhaps most similar to software mods in that they can aesthetically “subvert or comment on the original author’s intentions” (Anthropy 71). These mods change the visual setting of the game into one based on the personal preference of the individual hacker.
Ambience Glitch
NES Ambience Glitch from Nina Belojevic on Vimeo.
Figures 15 and 16. Ambience glitch.
Time and Space Glitch: Some glitches can shift what appears on the screen, thus distorting the time, space, and setting of the game. In Super Mario Bros., one bend shows me the future of the game just before it takes place, allowing me to see a few moments ahead from where I am in the gameplay. This bend provides me with some obvious advantages. It also draws attention to the fact that these advantages are usually not available unless the console is bent, thus making practice and familiarity with the game and its hardware a huge factor in gameplay.[11]
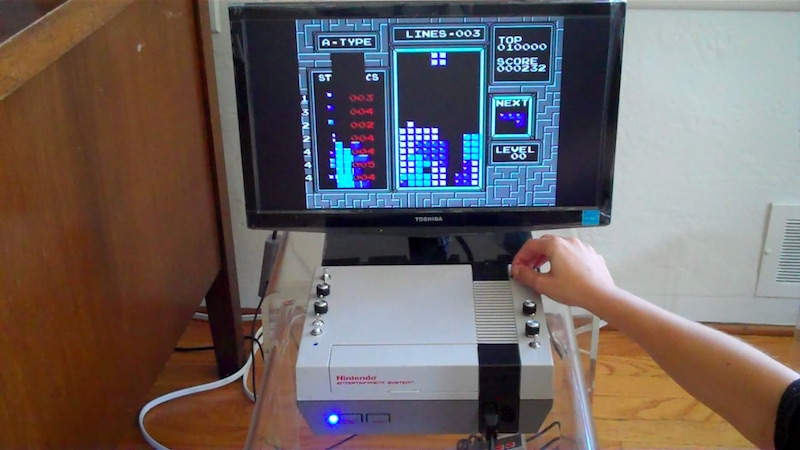
Mechanics Glitch: Game mechanics make up a large portion of the basic rules of a game and define the primary forms of player interaction. In fact, the core game mechanic is one of the key components that define a game.[12] Yet some glitches can change or tweak the core game mechanic. In Tetris, geometric square shapes in a variety of arrangements fall from top to bottom in a particular space and need to be placed in a way that allows as many pieces as possible to fit into that space. The player can turn the pieces clockwise or counter clockwise and move them left or right. Once a piece reaches the bottom or lands on top of another piece, it remains there until a complete row is filled, at which point the row disappears. The glitch I created shifts the placement of the static pieces between two states, adding a mechanic complication to the game. One piece could be placed based on a certain arrangement, but a switch can change that arrangement, shifting the location of available spaces. Thus, rather than assuming that the pieces should remain in a static space, the glitch adds another, rather serendipitous layer of dynamics to the gameplay. By adding a new game mechanic, this glitch fundamentally changes the rules of Tetris and how it is played. In the context of game studies, this glitch also underscores the importance of procedural argumentation. The game experience changes because the procedures of the game mechanic have changed, emphasizing the inherent role of procedures in videogames.
Mechanics Glitch
NES Mechanics Glitch from Nina Belojevic on Vimeo.
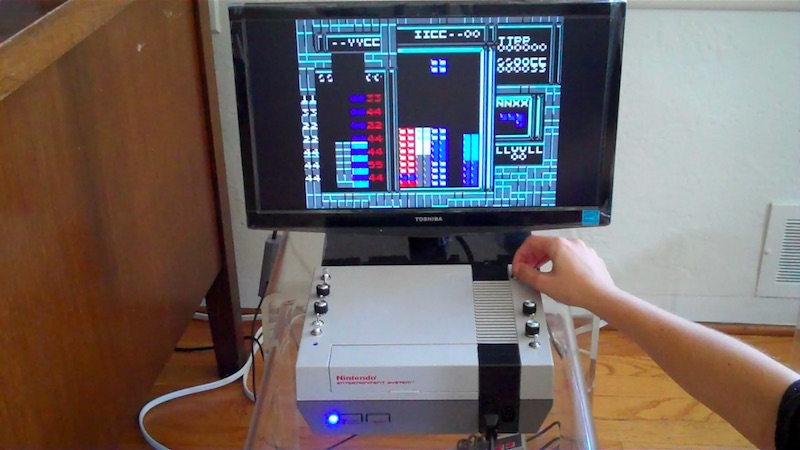
Figures 17 and 18. Mechanics glitch.
Audio Glitch: I also identified the audio area on the NES circuit board and was able to create glitches for volume, tone, and gain.[13] These three glitches draw attention to the ways in which the resistance and electrical connections on the circuit board affect speaker output.
NESAudioBend from Nina Belojevic on Vimeo.
Figure 19. Audio glitch.
A game can be played regularly with the audio running as usual, but the three glitches can be turned on and off to change (or distort) sounds. In this way, the glitch console allows the player to create remixes of popular videogame songs. Through these changes, the intended output developed by Nintendo’s sound artists and producers gets destabilized and reinvented through sonic interventions formulated by hackers.[14] In fact, the above-described glitches show how—through circuit bending—hardware hackers come to understand machine sound at a deeper level. Hackers unfold the seemingly abstract connections between the embodied push of a button and the sounds transmitted through speakers, uncovering aspects of how videogame audio works across a given platform.
Console Hacking as an Actionable Practice
As a practice, circuit bending offers a creative form of gameplay that does not necessarily follow the format intended by game companies. Hardware glitches provide a type of metagaming that takes place at a level that is largely removed from the intended game narrative. In fact, hardware glitches could be seen as an example of the often-neglected mods of gameplay that Galloway envisions in his call for a “radical action” (Gaming 125), which “exists in opposition to and outside of the gaming mainstream” (108-09). In Gaming, Galloway notes that most artist-made game mods tend to “hinder gameplay, not advance it” (125). The glitch console approach performs a “critique of gameplay itself” while facilitating “countergaming as gaming” (125). Rather than succumbing to the unworkable interface that Galloway describes in Interface Effect, circuit bending sparks a critique of ideology and engages in gameplay at its most operational level, without a false sense of transparency or immediacy. Thus, a more consciously embodied, self-reflexive form of play emerges.
Perhaps the most interesting aspect of circuit bending and glitch console play as a game studies method is that it is a creative and playful activity. By engaging in it, the hacker/player opens up forms of gameplay that were never intended by the game company that designed the console, and thus creates a metagame uniquely informed by personal context, environment, and lived experience.
[1] Reed Ghazala is often said to be the “father of circuit bending,” having coined the term after creating some of the first circuit bent instruments in the 1960s (Yeaton).
[2] As Stephanie Boluk and Patrick LeMieux note, “metagaming” is “a truly broad label for the contextual, site-specific, and historical attributes of human (and nonhuman) play” (Kindle Locations 365-369). The various forms of hacking and modding I’ve included here fit within the following description: “From popular mods to ironic parodies and from fan fiction and forum discussion to the latest trends made famous by professional players, metagaming functions as a broad discourse, a way of playing, thinking, and making that transforms autonomous and abstract pieces of software into games and turns players into game designers. Metagames reveal the alternate histories of play that always exist outside the dates, dollars, and demographic data that so often define videogames in industry magazines and encyclopedia entries” (Kindle Locations 221-228).
[3] Matthew Kirschenbaum delineates between “formal” and “forensic” studies of materiality by explaining that formal materiality relies on the understanding that computers manipulate bits or symbols that can be set off and on, rather than manipulating actual matter (11). Thus, formal materiality recognizes digital media as “an abstract projection” that can “propagate the illusion […] of immaterial behaviour” (11). Forensic materiality is based on “the principle of individualization […], the idea that no two things in the physical world are ever exactly alike” (10). Similarly, through an emphasis on circuit bending and glitch consoles, I argue for a material, practice-based engagement with hardware as a way to understand the unique, physical properties of videogame platforms.
[4] For a more detailed study of circuit bending as an applied media studies methodology that digs into issues of labor, production, and disposal of consoles, see my article “Circuit Bending Videogame Consoles as a Form of Applied Media Studies.”
[5] Garnet Hertz and Jussi Parikka describe circuit bending as “an electronic DIY movement undertaken by individuals without formal training or approval and focused on manipulating circuits and changing the taken-for-granted function of the technology. The manipulator of consumer electronics often traverses through the hidden content inside of a technological system for the joy of entering its concealed underlayer, often breaking apart and reverse-engineering the device without formal expertise, manuals or defined endpoint” (426).
[6] See Reed Ghazala’s Circuit Bending: Build Your Own Alien Instruments and Nicolas Collins’ Handmade Electronic Music: The Art of Hardware Hacking.
[7] Playable glitches can be seen as an example of the type of metagaming that Stephanie Boluk and Patrick LeMieux invoke when they ask “can we reroute the logic of control to metagame the seriality of twenty-first century play?” (Kindle Location 2998).
[8] Sprites are static or animated images that appear within a larger scene in a video game. They could be player characters, non-player characters, or objects in the game.
[9] Wendy Chun discusses the impression of causality facilitated by GUIs and software in Programmed Visions.
[10] Matthew Kirschenbaum terms “medial ideology,” which “substitutes popular representations of a medium, socially constructed and culturally activated to perform specific kinds of work, for a more comprehensive treatment of the material particulars of a given technology” (36). Such a view of technologies (like those used to play videogames) only recognizes the symbolic, formal, or graphical logic of interfaces, while—again—the material sources and hardware processes that make the games possible go unnoticed.
[11] As Anthropy notes, videogames tend to perpetuate exclusivity and alienation, because not everyone has the financial investment and time investment to spare on engaging in “leisure” activities such as playing videogames (14-15).
[12] As Katie Salen and Eric Zimmerman put it, "[t]he core mechanic of a game is the essential moment-to-moment activity players enact. A core mechanic is repeated over and over in the course of a game to create larger patterns of experience" (327).
[13] Gain, in this case, refers to the distortion of sound that can be heard if the input of voltage or current increases beyond the originally intended range.
[14] In Pink Noises, Tara Rodgers provides a collection of interviews with women in the electronic music scene. She describes these interviews as “sonic interventions from multiple sources, which destabilize dominant gendered discourses and work toward equal distributions in the cultural arenas where sounds reverberate” (19).
Anthropy, Anna. Rise of the Videogame Zinesters: How Freaks, Normals, Amateurs, Artists, Dreamers, Dropouts, Queers, Housewives, and People Like You Are Taking Back an Art Form. Seven Stories P, 2012.
Arcangel, Cory. “Super Mario Clouds.” Cory Arcangel’s Official Portfolio Website and Portal. 2002. http://www.coryarcangel.com/things-i-made/2002-001-super-mario-clouds
Belojevic, Nina. “Circuit Bending Videogame Consoles as a Form of Applied Media Studies.” New American Notes Online, vol. 5, 2014. https://nanocrit.com/issues/issue5/circuit-bending-videogame-consoles-form-applied-media-studies
Boluk, Stephanie and Patrick LeMieux. Metagaming: Playing, Competing, Spectating, Cheating, Trading, Making, and Breaking Videogames. U of Minnesota P, 2017.
Chun, Wendy Hui Kyong. Programmed Visions: Software and Memory. MIT P, 2011.
Collins, Nicolas. Handmade Electronic Music: The Art of Hardware Hacking. Routledge, 2006.
Galloway, Alexander R. Gaming: Essays on Algorithmic Culture. U of Minnesota P, 2006.
---. The Interface Effect. Polity, 2012.
Ghazala, Reed. Circuit Bending: Build Your Own Alien Instruments. Wiley, 2005.
Hertz, Garnet, and Jussi Parikka. “Zombie Media: Circuit Bending Media Archaeology into an Art Method.” Leonardo, vol. 45, no. 5, 2012 pp. 424-430.
Johnson, Jonathan Olaf. “Building an SNES ‘Glitch Controller’.” Maker Lab in the Humanities. University of Victoria, 29 Aug. 2013. http://maker.uvic.ca/snes/ .
Kirschenbaum, Matthew G. Mechanisms: New Media and the Forensic Imagination. MIT P, 2008.
Rodgers, Tara. Pink Noises: Women on Electronic Music and Sound. Duke UP, 2010.
Salen, Katie, and Eric Zimmerman. Rules of Play: Game Design Fundamentals. MIT P, 2003.
Yeaton, Sean. “Inside the Psychedelic Workshop of Circuit Bending Founder Reed Ghazala.” CNN. 22 June 2011. http://www.cnn.com/2011/TECH/gaming.gadgets/06/22/motherboard.reed.ghazala/index.html